Thursday, December 9, 2010

Realistic Miniature Houses? Yup, I can do that too!

These are some of the houses we had to paint for "Albert Herring" They were the most upstage piece of scenery and the designer was insistent on them being film quality with ridiculous amounts of detail, water marks, doorbells, milk bottles on the doorsteps and everything. I love them though, they were so much fun to do!

I called this house my "British Barbie Pink House". See the little milk bottle on the side door step?

They were even lit on the inside....by rooms and floors...they were a-dorable!

This house was a little bigger, but it was still just as much fun, especially with all that brick detail!

Detail of the bricks and all the window moldings and all the slate shingles on the roof--woo!

Can I faux finish art deco furniture? Sure can!

Apprentice Scenes at The Santa Fe Opera, I can't remember right now what scene this was from, but it was set in the Art Deco Period. My friend Adam McCarthy designed the piece, and I faux painted the wood to look stained, and did those little vignette panels which were based off of these really sweet old Chinese ink landscape paintings. The panels were gold leafed onto Masonite, painted on with some layers of burnt umber glaze, and then covered with a couple layers of Amber Shellac to get a shiny beautiful surface. We lined the back of it with some light weight bleached muslin so it could be back lit.

Here's the finished product:


Left Panel Close Up:


Middle Panel Close Up:


Right Panel Close Up:

Sunday, June 13, 2010

Santa Fe Opera-Madame Butterfly, Faux Finishes

This was just a simple little left over resin casting that we had laying around in the shop. The designer wanted us to turn a wooden Buddah into a bronze one. I grabbed this little guy to do a little sampling so I could get the greenlight from the designer before I started in on the real thing.

So this is what my little Buddah looked like in the beginning. It was carved wood (not sure what kind of wood, though...) It had a sealer on it, so I had to sand him down and shellac him so the paint wouldn't keep peeling off of him. A lesson that took me about an hour to learn...

I can't remember if I based him in red or white, but I'm going to say because we were concerned with his reflectiveness I based him in white, and then straight up Rosco gold-ed him.

Couple of burnt umber glazes to make him pop a little and give him some dimension.

Some more layers and a really wicked layer of patina on him, aced up with some silver rub-n-buff, and he turned out to be oh so pretty!

Sunday, May 16, 2010

Clouds on the way to Santa Fe

On my flight to Santa Fe last night, we were flying during the sunset.
I thought the clouds were doing some pretty swanky and beautiful things...thought I'd share a few pics that I took.


Enjoy!

My final bit on Jebus

After the 3 performances that Jebus debuted in, the guys in the Scene Shop felt it necessary to keep him and hang him in the scene shop, overlooking everyone, in all his elongated, larger-then-life self.

I give you the final resting place of the Juilliard Jebus:


Wait..what's that? What else has been added to Jebus, do you ask? Let me show you!


Yes, yes, that is a tool belt, some dodgy ray-bans, and a cigarette in his mouth.

This Jebus knows how to have a good time apparently.

Awesome!

Sunday, May 2, 2010

Hey Jebus!

I just wrapped up charging the Spring Opera at Juilliard. It was called "Dialogue of the Carmelites". The designer had these awesome ideas from the beginning of his design, and one of them was this 8' tall sculpture of Jesus. As soon as I found this out, I called dibbs on it and wanted to get my hands on this project because I knew it would be an awesome thing to work on. I've done a little bit of foam carving sculpture work before, but nothing of this size, so I welcomed the challenge.

The image that the designer gave me was El Grecco's "Christ on the Cross with Two Donors"

The designer referred to this Jesus (who I call Jebus for the duration of me working on this) multiple times as hott, and saucy.
......................ok?
I just love his obnoxiously elongated torso, personally.

We glued together sheets of 1" blue insulation foam, and transferred the pounce to the foam. One of the carpenters made this A-W-E-S-O-M-E hot knife made with a piano wire and a car battery and that thing carved through the foam like butter.
It was amazing!

Behold, said awesome jolly-rigged hot knife =] <3

Someone snapped a picture with my camera of me carving away on Jebus. I'm pretty glad they did it actually.

Footless, Handless, Faceless Jebus is my favorite kind. I think he kinda looks like a larger-then-life size of Rocky with a Scuba Helmet on.

Of all the things I carved with this guy, the bellybutton was my favorite part. When I was carving him the foam layers started looking really cool, kinda like rings on a tree. I thoroughly enjoyed it.

First time subtractive sculpture on a face was something I was not ready to battle with my time frame, so I opted for some additive sculpture with some paper clay. It was coming along well, but I needed a place to put my tools while I was sitting on top of Jebus's chest, so I figured since I was already boarder line getting struck by lightening, I figured I'd put my tools in his head.
.....hey! why not?!
This is what he looked like on stage. He was pretty snazzy, and looked well on the cross that we also did for this show. Oh yeah, and I had to crucify him myself with a large drill bit and some liquid nails. It was A-W-E-S-O-M-E. And by awesome, I mean I am completely and entirely surprised that I did not get struck by lightening at all during this process.

And here is a full stage shot to show some scale.

50 hours of work, and it was onstage for about 15 minutes for each of the 3 performances.

Love, love, love theatre!

Sunday, March 7, 2010

Finished Tromp L'Oeil

I finished my Tromp L'Oeil in the beginning of last week. It turned out pretty well, and I'm happy with the way it's turned out. Didn't take that long to do. It's a pretty tiny painting, only 2' x 2', so it's an exact painted replica of the two sculptures I just finished awhile ago. Anyways, here's the finished painting!


Here's a detail shot.


Enjoy!

Saturday, February 20, 2010

Mmmmmm trompe l'oeil

So the only time I've actually ever done anything trompe l'oeil related, I was a sophomore in high school.
After studying it on and off for 4 years at SCAD, and seeing my fair share of it, I figure it only necessary that I finally visit it properly, and do some for myself.
Not to mention I think it's a vital skill to have as a scenic artist.
And well, I want that skill.
So, here is the latest portfolio project I'm working on...

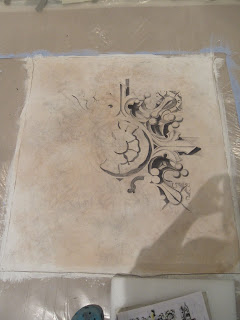
I've only worked on it for a couple of hours, so it isn't much to show so far. I'm currently working on adding Shade and Shadow. I used the pounce from my sculpture projects, and just mirrored it over. It's only 2' x 2' so it's pretty tiny, and I'm having to work on it with smaller brushes. Not to mention is pretty much impossible to work on it on a stick, so I'm having a lot of bonding time with sitting on the ground.
It's great.
P.S. sorry about the shadow!

Who Knew!!!

I can do sculpture!
Here's some portfolio pieces I've been working on for the past month or so at Juilliard:
I have this tendency to terribly over photo document my projects with process shots, so I am bearing everyone from seeing a gazillion pictures, and just showing a few.
So I found this beautiful drawing of a piece of Gothic architecture. It is listed as a 'Wooden Boss'
huh.

I scaled it up to 1' x 2', and gridded it out in 3" squares. Then I Sharpied it in, and used it as a pounce that I've probably used about 20 times so far.

The sculpture was 5" thick. I glued 1" sheets of blue insulation foam together. The top piece of foam is missing here. This is my Subtractive Sculpture where I transferred the image to the foamboard, and with a Chinese saw, a box cutter, A LOT of Dremel tool-ing, and about 2 weeks of working on it on and off....

and putting on a layer of Sculpt or Coat and spraying a couple of coats of off-white paint I got this fantastic little piece of happy!
Yay!

For the other half of my portfolio project, I did the same thing, but using an Additive Sculpture technique. After about 2 weeks of finding objects to add, way too many Styrofoam balls, felt, shoe pieces, leather strips, string, wood, foam-core, matte-board, packing peanuts, paperclay, foam, animal glue tape, bogus paper, and what seems to be about 5 pounds of hot glue, the final result turned out a little more colorful then my Subtractive Sculpture.

I discovered the beauty of Aqua Resin, and put a couple of coats over it to unify the texture, and sprayed a coat of off-white paint on it, and this is what I got:
It's pretty spiffy. I'm happy with the way it turned out.
Now onto my Tromp L'Oeil painting of the same thing. Yay!

Busy bee with art!

I've been trying to keep my artistic brain juices going by trying to work on various artsy things. Been really into vintage-esque things, and really muted color pallets. Also line weight. I'm really digging variety in line weight. I'm exploring these more and more, and I'm really excited about it. But alas, here is some things I've been working on.

I'm trying to doodle fast, look less...

and block in color better and faster.

I made this bag for my boyfriend's sister for Christmas. It was my first real attempt at making a bag from scratch, on my own, without my mom helping me. I was really proud of it! When I gave it to her, I thought she was going to pass out--apparently that means she really liked it. Score.

Detail of the bag, and I put one of her favorite phrases on it. I did all the embroidery by hand. I really dig that kind of stuff---if I could make a living off of doing that stuff, I'd think about it.


This is kinda old. I'm still exploring this ''couples'' series that I've been working on for the last year or so. Maybe I just like inking things...who knows.